流行りのkubernetesのクラスタをCentOS7を使って作ってみたので、その時のメモを残しておきます。
以下のマニュアルどおりにクラスタを作ります。
http://kubernetes.io/docs/getting-started-guides/centos/centos_manual_config/
環境と構成
環境は次のとおりです。
- CentOS 7.3.1611
- kubernetes 1.3.0
- flannel 0.5.5
- etcd 2.3.7
- docker 1.10.3
クラスタはmaster1台とminion3台で作って、最後にkubernetes-dashboardをインストールします。
| ip | hostname | service |
|---|---|---|
| 192.168.33.20 | centos-master-1 | etcd kube-apiserver kube-controller-manager kube-scheduler flanneld |
| 192.168.33.31 | centos-minion-1 | kube-proxy kubelet flanneld docker |
| 192.168.33.32 | centos-minion-2 | kube-proxy kubelet flanneld docker |
| 192.168.33.33 | centos-minion-3 | kube-proxy kubelet flanneld docker |
CentOS7はvagrantを使って用意します。
$ mkdir k8s-example && cd k8s-example |
下準備
レポジトリの追加とkubernetesで必要なものをインストールします。selinuxとかfirewalldが起動してあるのであれば、ここで停止しておきます。
以下の設定は全てのインスタンスで設定します。
root$ setenforce 0 |
kubernetesの設定をmaster/minionの両方に設定します。root$ cat /etc/kubernetes/config
# Comma separated list of nodes in the etcd cluster
KUBE_ETCD_SERVERS="--etcd-servers=http://centos-master-1:2379"
# logging to stderr means we get it in the systemd journal
KUBE_LOGTOSTDERR="--logtostderr=true"
# journal message level, 0 is debug
KUBE_LOG_LEVEL="--v=0"
# Should this cluster be allowed to run privileged docker containers
KUBE_ALLOW_PRIV="--allow-privileged=false"
# How the controller-manager, scheduler, and proxy find the apiserver
KUBE_MASTER="--master=http://centos-master-1:8080"
masterの設定
まずはmasterの設定です。masterではetcdを動作させます。
root$ yum install wget etcd -y |
apiserverはminionのkubeletから接続できるようにしておきます。apiserverにはhttp://centos-master-1:8080で接続出来るようになります。KUBE_ADMISSION_CONTROLは今回はdisableにしておきます。root$ cat /etc/kubernetes/apiserver
# The address on the local server to listen to.
KUBE_API_ADDRESS="--insecure-bind-address=0.0.0.0"
# The port on the local server to listen on.
# KUBE_API_PORT="--port=8080"
# Port minions listen on
# KUBELET_PORT="--kubelet-port=10250"
# Comma separated list of nodes in the etcd cluster
KUBE_ETCD_SERVERS="--etcd-servers=http://127.0.0.1:2379"
# Address range to use for services
KUBE_SERVICE_ADDRESSES="--service-cluster-ip-range=10.254.0.0/16"
# default admission control policies
#KUBE_ADMISSION_CONTROL="--admission-control=NamespaceLifecycle,NamespaceExists,LimitRanger,SecurityContextDeny,ServiceAccount,ResourceQuota"
# Add your own!
KUBE_API_ARGS=""
etcdもminionのflanneldから接続できるようにしておきます。root$ cat /etc/etcd/etcd.conf
(...)
ETCD_LISTEN_CLIENT_URLS="http://0.0.0.0:2379"
(...)
ETCD_ADVERTISE_CLIENT_URLS="http://0.0.0.0:2379"
(...)
192.168.33.0/24でPod間の通信をするためにflanneldの設定をします。root$ cat /etc/sysconfig/flanneld
# etcd url location. Point this to the server where etcd runs
FLANNEL_ETCD_ENDPOINTS="http://centos-master-1:2379"
# etcd config key. This is the configuration key that flannel queries
# For address range assignment
FLANNEL_ETCD_PREFIX="/kube-centos/network"
# Any additional options that you want to pass
FLANNEL_OPTIONS="--iface=eth1"
FLANNEL_OPTIONSの–iface=eth1はvagrantのための設定なのでvagrantを使っていない場合は不要です。
vagrantはeth1で他のノードと通信するためこの設定が必要です。
設定しないと以下の様なエラーがでます。Error: 'dial tcp 172.30.17.2:9090: getsockopt: no route to host'
Trying to reach: 'http://172.30.17.2:9090/'
etcdを起動して、設定を追加します。root$ systemctl start etcd
root$ etcdctl mkdir /kube-centos/network
root$ etcdctl mk /kube-centos/network/config '{ "Network": "172.30.0.0/16", "SubnetLen": 24, "Backend": { "Type": "vxlan" } }'
masterで必要となるserviceを起動します。root$ for SERVICES in etcd kube-apiserver kube-controller-manager kube-scheduler flanneld; do
systemctl restart $SERVICES
systemctl enable $SERVICES
systemctl status $SERVICES
done
minionの設定
minion-1,2,3で同じ設定をします。
podを管理するためのdockerをインストールします。
root$ yum install -y docker |
kubeletの設定をします。設定中のcentos-minion-nのnは適宜設定すること。
root$ cat /etc/kubernetes/kubelet |
minionもmasterと同様にflanneldを動作させるので設定します。
root$ cat /etc/sysconfig/flanneld |
必要なserviceを起動します。root$ for SERVICES in kube-proxy kubelet flanneld docker; do
systemctl restart $SERVICES
systemctl enable $SERVICES
systemctl status $SERVICES
done
最後にminionをどのクラスタに参加させるのか設定します。root$ kubectl config set-cluster default-cluster --server=http://centos-master-1:8080
root$ kubectl config set-context default-context --cluster=default-cluster --user=default-admin
root$ kubectl config use-context default-context
minion毎に設定すればインストールは完了です。
動作確認
まず、クラスタがうまく作れているか確認します。nodesで確認すると作成した3台のminionが表示されるはずです。
root$ kubectl get nodes |
describeで見るとnodeの詳細な情報が得られます。root$ kubectl describe nodes
nginxのpodを作って動作確認してみます。imageはdockerhubから取ってきます。
root$ cat nginx-pod.yaml |
起動させます。root$ kubectl create -f nginx-pod.yaml
pod "nginx-pod" created
しばらくすると、起動するはずです。root$ kubectl get pods -o wide
NAME READY STATUS RESTARTS AGE IP NODE
nginx-pod 0/1 ContainerCreating 0 28s <none> centos-minion-1
root$ kubectl get pods -o wide
NAME READY STATUS RESTARTS AGE IP NODE
nginx-pod 1/1 Running 0 3m 172.30.4.2 centos-minion-1
centos-minion-1にpodが作成されて、flanneldが管理するVLANのIP(172.30.4.2)が割り当てられていることが確認できます。
試しに、curlでリクエストを送るとnginxのhtmlが返ってくることが確認できます。root$ curl 172.30.4.2
<!DOCTYPE html>
<html>
(略)
</html>
dashboardのインストール
kubernetesの種々の情報表示や操作が出来るdashboardをインストールします。
インストールは構成ファイルを取ってきてpodをcreateするだけでできます。
https://github.com/kubernetes/dashboard
root$ wget https://rawgit.com/kubernetes/dashboard/master/src/deploy/kubernetes-dashboard.yaml |
podの中からcentos-master-1が名前解決できないためかapiserver-hostに名前を記述すると接続ができない状態になったため、IPを記述しています。
root$ kubectl create --v=10 -f kubernetes-dashboard.yaml |
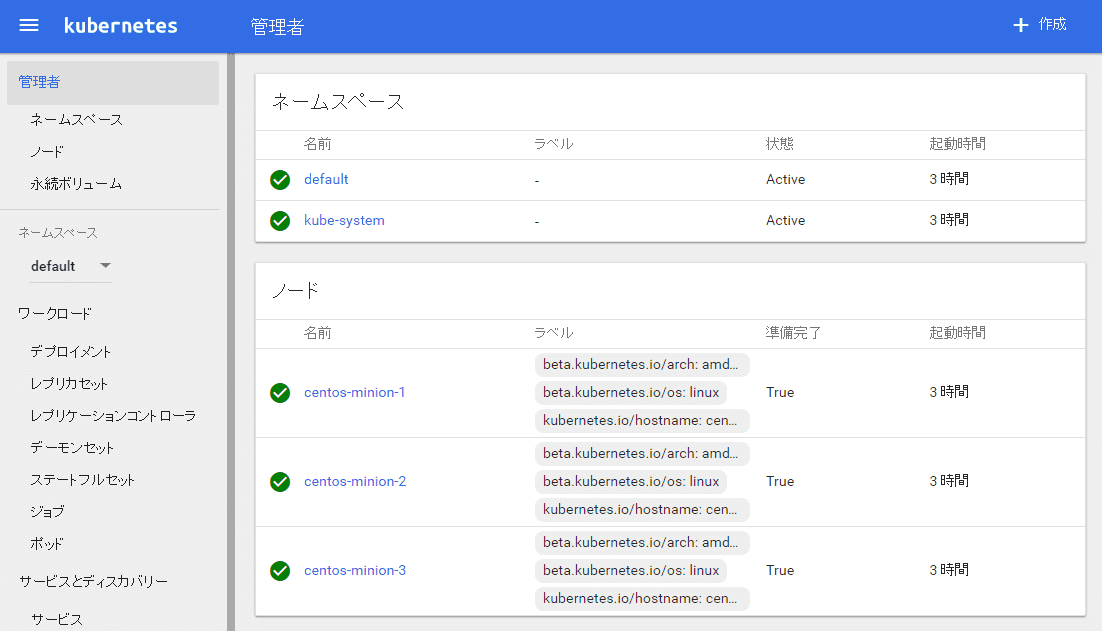
しばらくするとpodが起動します。起動完了したあと、http://192.168.33.20:8080/uiに接続すると以下の様な画面が表示されます。
おわり。